Showing posts with label Charm Squares. Show all posts

Tuesday, June 12, 2012

Charm Square Pillows


I was googling around for charm squares and I came across these fabulous pillows! First, I came across the Orchard Road blog and then the Orchard Road etsy shop! I think this idea makes a great addition to the Charm Square Sewing Project list.


These pillows were made using Moda charm squares, but wouldn't these be great using your own hand-printed charm squares? Or, mix and match. Hmmmm....or you could just buy these!


I think this brown color combination is my favorite. And I love the chunky knitting on the back! Thank you Orchard Road!


Tuesday, March 6, 2012

And More!

I noticed that I very enthusiastically said "and more!" twice in last week's post, so I thought I'd just go ahead and start off with that! Because this post features MORE projects using printed charm squares, only these are the no-sew variety. Except for one, as you will see. For all of these projects, I started with using iron-on adhesive to bond the fabric to some sort of paper backing. 


Starting off with my favorite! What could be more wonderful than hand-printed fabric picture frames to show off pictures of your family members? Materials: hand-printed charm square, iron-on adhesive, mulberry paper backing, poster board (I used black for this), and glue. And, of course, a cute photo. I have to confess that this is not actually a picture of Frankie. But this frame made me realize I need to have her portrait taken. 


I love these little accordion books and this worked out so well with the different (but coordinated) patterns on each cover. You can fill these books with photos, doodles, souvenirs, etc. and then mail them like a multi-page greeting card, carry them around in your purse like a book, or set them on display anywhere around your house. 


Now, this idea is a work in progress. Charming fabric greeting cards.  I love the idea, but I need to work out the stitching. I think it would look better hand-stitched, don't you?


And why do these stitches look slanted? That's looking a bit strange if you ask me. If you have any idea what the problem might be, please share! I suppose it's time to make a trip to the sewing machine repair shop for a tune-up.


And here we have a very nice set of coordinating coasters. These take a bit of work. After you bond the fabric to paper (I suggest something sturdy like card stock), you need to seriously glue it on to a cut-to-size square of cork backing. Then, you iron on some iron-on vinyl (love using this stuff!). I used a matte finish vinyl for these, but the vinyl is more easily found in the gloss finish. This way you can just wipe off any spills or stains. I call these my faux tile coasters and I carry a few sets in my shop. This set did not pass quality control, I'm afraid. One of them has an odd bumpy texture. Don't you hate it when that happens?


Friday, March 2, 2012

Charm Square Sewing Projects

As promised, a few simple sewing projects using the hand-printed charm squares from last week. Of course, there are many many more uses for these simple squares. They can be incorporated into any sort of quilting project and are easily sewn into fabric coasters, sachets, gift bags, card holders, and more!


This cottage style wristlet has just been listed in my shop, where you can see more photos and a detailed description. I used two matching hand-printed charm squares on the front of the bag and one of my favorite vintage fabric swatches on the back and on the strap. Printing with the ink pads does give the design a more faded or weathered look, which I think can be very appealing and works well with this casual, vintage look. The charm squares are separated by this fabulous hand-printed satin ribbon which I acquired through a fabric swap with Jesse Breytenbach. Jesse, otherwise known as Jezze, has a wonderful blog full of inspiring visuals, hand-printed fabric items, tutorials and more! Check it out. 


A zipper bag using two charm squares on either side along with squares of 100% hemp canvas. Also availible in my shop.


This sweet bag only uses 1/2 of a charm square. Just enough to make this solid blue velvet bag special. And, as common as they are, I love pearl snaps! This bag will make a great gift pouch for my niece who has a birthday next month.

Hopefully by early next week I will have a few no-sew (my favorite!) charm square projects.

Have a nice weekend!

Saturday, February 25, 2012

Thursday, February 23, 2012

Simple fabric stamping tutorial


Stamping on pre-cut small squares of quilting fabric, using ink pads rather than fabric paint, is a wonderful way to explore pattern making quickly and playfully. For this tutorial, I am going to use my "Wild Flowers" set of clear decor stamps. 


You will need a charm pack, which is a packaged stack of pre-cut squares (usually 5" x 5") of quilting fabric.  Choose white or ivory to start with. These charming stacks can become your fabric-printing-idea sketchbooks. But, most likely, you will have results fabulous enough to put right to use in a number of sewing projects!


Also needed will be ink pads that are specially formulated for use on fabric. This is almost always stated on the back of the packaging, but one line I can recommend is the Palette Hybrid Line. Be sure to heat set the inks by ironing if you will be washing the fabric in the future. 


Also, at least one acrylic block with grid lines. If you can't find a block with grid lines, you can create your own with a felt tip pen or by actually "engraving" your own lines with an craft knife. You really only need the horizontal and vertical lines to mark the center. Ooops, some of mine are rather stained from use!


You will need a grid that can be seen through your fabric. I like to create several different grids on my computer and print them out, but of course you could use a pen and a ruler. The lines should be dark enough to be seen through the fabric. Make a few with different measurements and be sure to make one in the measurement of the largest stamp in the set.  The largest stamp in this set measures 2", so I made a 2" grid. Since 2 doesn't divide evenly into 5 (size of fabric) I made a 5" x 5" red lined square the size of my fabric and placed it so that it is centered over the grid. 


To get started, place your first stamp, carefully centered on the acrylic block. Since the stamps cling, it is often easier to place the stamp upside down on a grid, then lower your block over it until stamp and block connect. Now, take your fabric square and tape it over the grid. Ink your stamp, making sure you have full coverage but being careful to only ink the raised portion of the stamp and not the recessed areas or edges. Hold the block, stamp side down, just over the fabric and very carefully line it up with the grid. Then hold your breath and press! You need to press a little harder than you would with fabric paint, but you don't want to press so hard that you distort your image. Repeat this process with the same stamp at the measured spots on your grid. (In the photograph, the grid is hard to see. This was not the case in real life!) Make sure not to print over the tape, leaving an empty spot on your fabric where ink should be. It is easy to just pick up a corner of the tape if needed.


Once you have your first stamp printed in repeat, you can choose your next motif using the acetate sheet which features all the motifs printed in black. This sheet is included with each stamp set. You can also remove the tape and gridded paper at this point because you will visually line up the next stamp-on-a-block with the already printed one.


Choose your next color by testing the colors on paper. However, the colors will appear lighter on the fabric than they do on paper. Of course, a one-color arrangement is also very nice!


I like to add some dots now and then. The eraser on the end of any pencil makes a great dot stamping tool. I erased this eraser down a bit all around the edges to make the dot smaller. Still just a bit large. Note to self: find some thinner pencils with erasers!


A great tool that makes this process so much faster, is a damp stamp scrubber cleaning pad. No need to run to the kitchen to wash the entire stamp and block. The scrubber also works with fabric paints and that is why mine is so stained! Replacement pads are available, so I should look into that! Still working fine, however. Just rinse well at the end of your printing session, or during if the pad loses it's cleaning power. If you can't find a pad or don't want to invest the money, a wet toothbrush will also work. With either choice, just be sure to use a lint-free cloth to dry the stamp. The clingy stamps love to cling to lint. A flour sack towel is my lint-free cloth of choice.


Now print away, playing with colors, color combinations, different arrangements and motifs. You can even throw away your grid and simply scatter-print your fabric square! Go crazy.


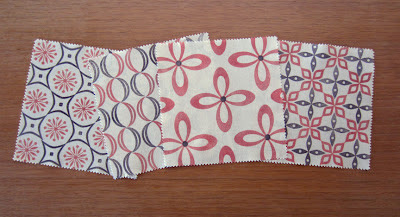
After a short time, I ended up with several printed squares, all nicely coordinated. Now, let's think of some sewing projects using these squares.........


Have Fun!