The Anatomy of a Stencil
The entire mylar sheet is 8 x 8 inches. Centered on the sheet are the cut-out shapes that create the pattern. The cut-outs are spaced 2 inches apart (from center of shape to center of next shape). If you were to draw a line around all the shapes, touching the outside edges of the group of cut-outs, you would have a 5 x 5 inch square. This fits nicely on a charm square for quilting. However, on all four corners, there is a small dot cut-out. It is about the size of a pen or pencil point. These dots are spaced 6 inches apart, side to side and top to bottom. These dots mark the repeat, which is 6 x 6 inches, which allows you to print out a much larger piece of fabric.
A closer look at that small dot.
Before you start printing your repeating design, you should map out this repeat on your fabric. You could mark each dot with a fabric pen, the kind with the disappearing ink. If you choose this method, it is important that you test the ink on your fabric first because I find that the ink does not disappear on all fabrics. It should disappear with only a drop or two of water because you will not be able to wash the whole piece or your carefully printed paint will wash out. And it you iron it first to set the paint, you will also set your ink! From the photo above, it is obvious what I would recommend. Place a small piece of tape (I used white tape but any sort of tape will do) under the dot and then mark the dot, on the tape, with a regular pen or pencil. This has two advantages. First, you won't have to worry about the mark becoming permanent on your fabric. Second, the tape protects the fabric from the paint as you roll it out over your stencil design. You may like to reference this tutorial for some basics on paint and how to apply it!
Be sure all four holes are registered exactly over your dots when you begin printing. I used double-stick tape on the underside of my mylar stencil to keep it in place. If you do this, I recommend removing this tape before washing the stencil or it will be gummy and much harder to remove. Some like to use spray-on adhesive rather than tape, but I think this would be even harder to remove. Easiest thing would be to use masking tape on the edges of your stencil, being careful to not tape over a freshly painted (and still wet) motif.
And away we go! Register dots, roll paint, lift, and repeat. So easy!
Now, this is what we call a "half-drop" repeat. The motif is printed again, "dropped" half-way across the width and height of the neighboring motif. Rather than the cut-out shapes being spaced 2 inches apart, side to side and top to bottom, they are now spaced 1 inch apart in both directions. To create this spacing, place the cut-out dot over the already-painted motif. This time, use tape OVER the dot to protect it from the next printing.
When you are finished printing with that color and stencil, wash it on a flat surface. If your sink is really large and has enough surface area away from the drain, you could use that. Otherwise, a cutting board works nicely. Good to have one just for this purpose!
Another stencil drying technique. Hang your stencil from a skirt hanger on your shower curtain rod where it can very happily drip-dry.
I'm going to add another color. To make the half-dop registration easier, I drew a line between the registration dots with a permanent ink pen.
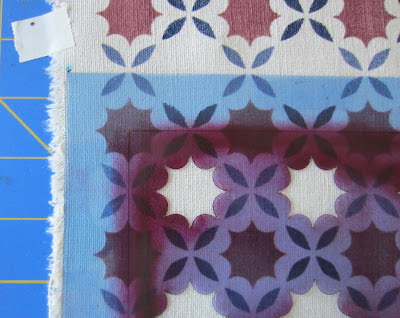
The first printing of the red 8 pointed star motifs are half-dropped between the blue petal motifs. Then, the second red printing is half-dropped from the first red printing. Which means the registration dot is placed right in the center of the previously painted red 8 pointed star. You can see the black line here that helps to line everything up very neatly.
Then, I added some detail using a stamp from my "Wild Flowers" stamp set. Now I am wishing that I had used a lighter color than the brownish-red I used for the 8 pointed starts. The black stamped paint works nicely but I would have preferred more contrast. But you get the idea, I hope.
I added some black dots using an eraser from the end of a pencil as a stamp.
I decided to try a brighter combination using only the 8 pointed star stencil and some hot pink paint.
I love this stamp from my "Deco Garden" stamp set and I love a pink with red color combination!
Which created a fun and colorful flower!
I decided this design looked best without a half-drop. Keep it simple! One thing I notice is that some of the pink stenciled areas got a little dark. That is where I was a bit heavy with my roller rolling. Practice! When you are looking through the stencil the coverage might look too light, however, once the stencil is removed you will see that all is fine! It doesn't take much, especially if you are going to stamp on top. Doing a test swatch is always a good idea!
The stencils should be in my shop by the end of the day. Just need to print up a few packaging inserts and then write up and post the listing. I hope this tutorial was helpful! Questions?


No comments:
Post a Comment