Showing posts with label Craft Ideas. Show all posts

Monday, January 25, 2016

Ideas for Fashion Fabric Printing

I love movies. I frequently end my day by watching some random independent film, at home, that I find on Netflix or Amazon Prime Video. I have taken a chance on many and have mostly been pleasantly surprised! I have to admit that I'm not too picky. Maybe that is because, even if I don't enjoy the storyline, I can still enjoy the visuals. Last night's feature is a good example. I was happy to find a new Woody Allen film that I somehow missed when it was in the theaters (probably very briefly) this past summer. I've always been a Woody Allen fan, and even his less successful films deliver very stylish and lush visual experiences. I would say "The Irrational Man" is such a film, more of a sketch than a fully realized cinema experience but it was very pleasing to watch. I loved all the attractive actors and the seriously flawed characters they played. The story took place on a leafy college campus near the coast, allowing for varied and beautiful scenic shots. The weather was perfect throughout! However, the big surprise was that I was very inspired by Emma Stone's clothing. I don't usually go to the movies expecting to find fabric printing inspiration!


Here is Emma with her handsome co-star, Jaoquin Phoenix, wearing an absolutely charming embroidered top. Of course, you know what I'm thinking! Rather than using embroidery, couldn't that easily be strategically placed stamped motifs? Or, even better, combine the stamped motifs with embroidery!


A closer look!


One could print the fabric first....possibly after cutting the shirt or dress pattern so that you get the placement exactly right. For the sweet tank top in the photo above, looks like just a few swatches would be all that you would need to create something really special. I realize this is winter and these are warm weather tops, but I think the idea could be adapted for winter clothing or the lighter weight tops could be used as layering pieces. Who doesn't wear tank tops to peek out from under sweaters or jackets all year long? Also, never too soon to start sewing for spring/summer. Warm weather will be here before you know it!


It was not easy finding a good photo of this dress. Different motifs make up the sides on the body of the dress, the strip going across her chest, and then the strips going over her shoulders. Quite stunning when you see it in action! And although the movie was not his best, it was fun, quirky and surprising. Worth a watch!

Photo courtesy of InStyle.com

And, what do you know, while searching for Emma Stone's blouse images, I discovered that I was, of course, not the ONLY one out there who was inspired!


Create this look using Yardwork's Clear Fabric Stamps!


Saturday, February 15, 2014

My New Model

I finally broke down and purchased a dress form to model whatever "fashion accessory" I might decide to sew up. Strange because I had been trying to make a policy with myself not to do anymore sewing for my Etsy shop. But, you know, I've got all this fabric to tempt me! I know myself too well…..


The wooden peg topper is a little spooky, so I tried to create at least the suggestion of a head. An atmospheric head, if you will. 


It's an improvement over the simple wire hanger, I do believe. And the scarf has since sold! Who knows if the model made the difference? It's really a lovely fabric combination. Perhaps I'll make another. 


There are a few other scarves still available,
such as this pretty red one….


a very dazzling one in indigo ….


….and another red scarf, using my "Flower Field" fabric from India.
This is one of my favorite block printed fabrics that I carry.


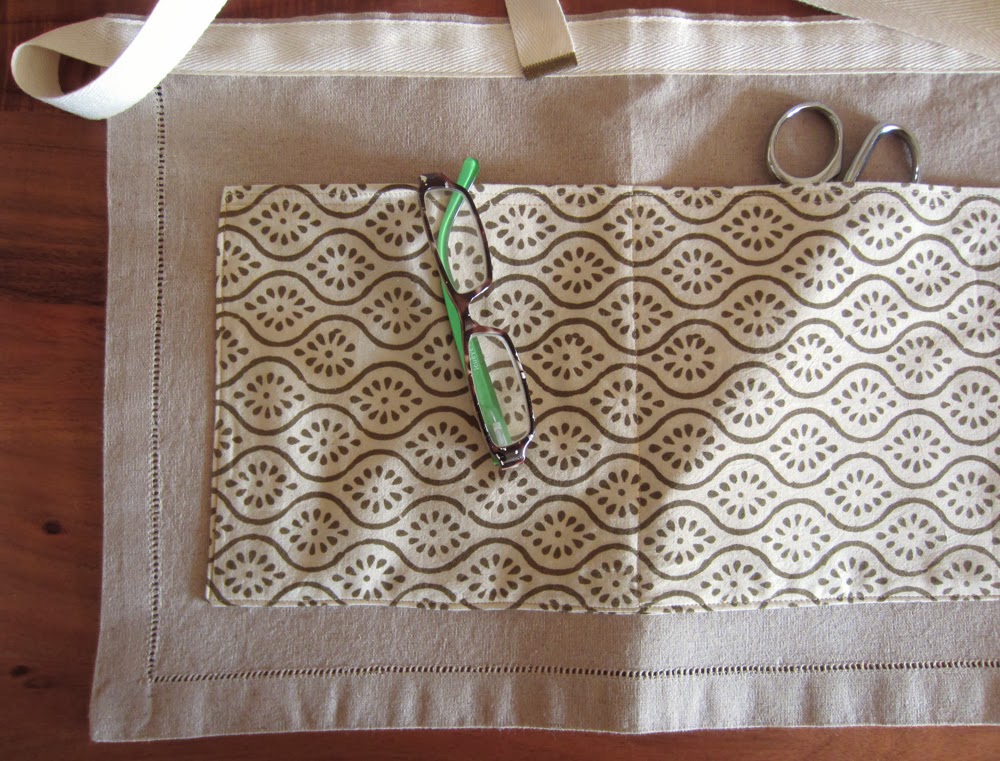
My new model also comes in handy for  apron display!

This is a new item in my shop. A simple half apron made from a hem-stitched linen placemat. I purchased a few of these blank linen placemats during my pre-holiday placemat obsession. They are on the large side and I lost interest in the original idea I had for them. I also had a roll of 1" off-white cotton twill tape sitting around with no place to go, so this apron was born out of a need to make use of extra supplies! The only hold-up I had was how to deal with the raw edges on the ends of the twill tape ties. I tried folding the ends under and sewing, but the result was a bit bulky. I tried making little fabric tab ends, but that clearly was going to add hours to what should be a simple project.


I finally came up with these metal ribbon ends. I had to search to find some that didn't have little rings on them for jewelry making. I think they are a nice touch. 


It is amazingly lightweight and comfortable to wear. I wear the "design development" sample that I made all the time. It solves the "where is my phone" or "where are my glasses" problem very well!

I hope to make a few more today in different color choices. 


Monday, November 25, 2013

Red Rubber Stamps

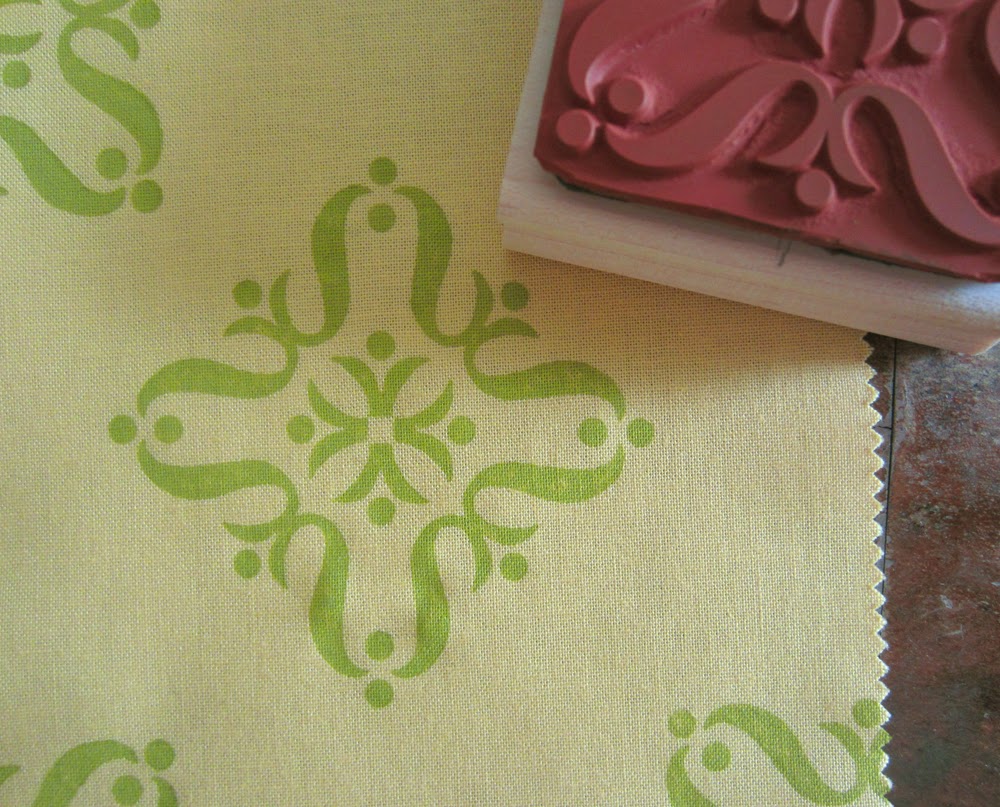
Just a quick blog post to announce my new decorative red rubber stamps! Once again, just like my clear stamps, they were designed with fabric printing in mind!

The only problem I have had with wood mounted rubber stamps is that you can't see where you are putting the image. Normally the stamps are mounted somewhat haphazardly, meaning they are not in line with the square block they are on. I had this problem with my Yardwork stamp that I am using on my muslin bags and other packaging.


I think you can see that it is not quite straight! You might be able to see the little pencil marks I made on the sides. I brought those little marks up and on to the top of the stamp to make, basically, registration marks. I decided to offer this for my new wood mounted stamps, as I don't see how people live without them! To make the marks permanent, I burn the lines with a wood burning tool. Not too decorative but extremely functional. Of course you could draw these lines yourself, and that's why I offer to just glue your stamp on a block without the careful registration for 3 dollars less. Less work for me!


Mounting stamps is a messy situation which takes extra supplies and time. The large block, needing to go into a box for shipping also drives that shipping cost up. I know that a lot of the serious stampers out there already have these supplies and are even removing rubber stamps from their mounts to make them what we call "cling stamps" that can be used with acrylic blocks. This makes storing the stamp a lot easier because it takes up so much less room! So I made the executive decision to also offer the stamps unmounted. Both the stamp and the shipping will cost a whole lot less! 

Wood mounted stamp with registration marks = $18.00
Wood mounted stamp without registration marks = $15.00
Single unmounted stamp = $8.00
Full sheet of four stamps = $15.00

The very best deal is to buy the whole uncut sheet of four stamps for $15.00 because that is only $3.75 per stamp! What a bargain!


See, I told you the red rubber stamps business was a can of worms! So many options! And I searched high and low on this world wide web to find a way to have this sort of stamp made in the small-scale way that I could afford. I certainly thought about offering the cling stamp mounting but that will have to come later. I have to see if the buying public even likes my stamps before I invest in any more supplies. 


I think this one is my favorite. Reminds me of a henna tattoo motif, so that's what I called it! These stamps work beautifully on both fabric and paper. I don't do clay crafts but I understand people like to use them that way too. I think possibly one would want to make a reverse mold to use them as bakery decoration or as soap stamps. Wouldn't that be cool? Need to research that…….


Second favorite, Mid Century Modern Flower. This stamp was featured in a Poppytalk curated collection called DIY + Make  which brought in lots of viewers. Thank you Poppytalk! Here's hoping the viewers become buyers!


It's a toss-up for my personal third and forth place favorites. This image that I designed reminds me of Japanese folk woodcut or paper cut flowers. Maybe I'm wrong about that but it IS my design and I'm gonna call it Woodcut Flower Field. I think this one gets better in repeat. It would be really beautiful pressed into clay. 


Last, but certainly not least is what I'm calling my Rococo stamp. More of a modern rococo, if you will.

Right now, I don't know how many wood blocks to stock up on because I have no idea how people will prefer to buy them: mounted or unmounted. If they buy them. 


The wood mounted stamps come in the same charming muslin bag that my acrylic blocks come in. Making them great stocking stuffers! I may pick up some more colorful ink pads today so I can stamp each individual stamp image on the other side. We'll see. I don't want to have to get fabric paint out every time I sell a stamp, yet it would be so nice to have the image on there. Stamping too many with paint ahead of time might create waste. 

These are the dilemmas and decisions I face daily!

Thursday, November 21, 2013

DIY Gift Idea

I received a catalog in the mail the other day. It is from a company called Serena & Lily, based out of California. The catalog introduces some really beautiful silk-screened table linens!


Serena & Lily holiday 2013 catalog

Aren't they nice? A set of four napkins, silk-screened in metallic paint, is $38.00. Not so bad, I don't think. However, not to toot my own horn (although I do have this blog!), one could get similar results for less using my Yardwork Craft Stencils and fabric. In fact, their "cut circle" design is very similar to one of mine, although their circle appears to be much smaller. So, napkins made with my stencils would have a much bolder look. Even more bold if you choose to use brighter or darker colors. But I do love the look of the metallic silver and gold! Great for the holidays! I have printed with metallic fabric paints and they do have a nice sheen which miraculously holds up after washing. Now, I don't know how many washings they will withstand, but that is true about any printed textile. 

My stencils have not been big sellers and I often wonder why. They are a great tool to use with my stamp sets. Perhaps it is because the shapes are so simple, but I think this is what is appealing about the Serena & Lily table linens. So sophisticated! Although that elaborate embroidered table runner design is fantastic!

Just to show you the endless possibilities, I have put together a few combinations, first using only the stencils and then using both stencils and stamps. (you can click on the images to enlarge)

stencils with stencils


stencils with stamps


See my fabric stenciling tutorial here!

I don't have the fabric handy to whip up some napkin sets of my own, but I encourage you to do so! A handmade gift is even more special when you've made it yourself. 

I did have one small square of hemp canvas that I had used my stencils and stamps on. I was developing some idea that got put on the back burner for some reason. Inspired by the Serena & Lily silk-screened items, I decided to make something out of it. That "something" became a zipper pouch, now available in my shop


I hope you like it!

Tuesday, October 22, 2013

My Creative Cousin

I received a wonderful surprise in an email last week from my cousin Laura. Laura is a prize winning quilter living in Alabama. Months ago I sent her one of my fat quarter/four patterns swatches without either of us knowing how she was going to use it.


I am so impressed and pleased that she was able to combine the different prints, as busy as they are, in such a successful way. I think the transparent fabric works to soften the contrasting pattern, plus you can find what you are looking for without even having to unzip! Laura said she used a clear shower curtain liner, with a slight texture, which worked much better than the vinyl fabric she had purchased at the fabric store. Great idea! I've thought of using shower curtain liners as sort of a water-proofing in between layers of fabric, but it's fabulous seeing it working on the exterior. Hey, I might have to borrow her idea at some point! She used a pattern from Atkinson Designs for these adorable bags. 

Sadly I don't sell the fabric in my shop anymore. I became somewhat concerned about the washability of digitally printed fabric and didn't feel right promoting it. I think it is perfectly fine for an item that is not going to be washed frequently, such as a zipper bag, but I wouldn't recommend it for home decor or a heirloom quilt. 

Anyway, I've been going back and forth on how to deal with gift-giving season! I finally came up with a placemat design that I'm happy with. I must have made five to ten different constructions in this placemat journey which will make for a lively table setting if I ever get around to having a dinner party again! Perhaps it's my limited experience with sewing but I just felt the need to make mock-ups rather than plan on paper. It's the best way to see how long an item takes to make and zero in on the most efficient way to put it together. Plus, I'm a picky perfectionist along with being rather insane!


I taught myself how to sew a mitered corner and then went crazy with it. I was tempted to add yet another layer and may just do that for the next set. I love the pattern layered over pattern and the way the construction results in fluttery, yet finished edges. 

For weeks I've debated about designing several new sets of stamps. I have some designs in the works but, being picky and insane, I just doubt I could do my best and get them made and in the shop in time for Christmas, etc. I'd much rather take my time with them and have the unveiling sometime in early spring. 

So, it looks like I'm in for some hand-printing and obsessive sewing for the next few months! Let's see what I can come up with......


Wednesday, October 2, 2013

More and More Placemats!

My shop was closed last week and the notice I left to customers said that I had a family emergency. That is not totally accurate but it seemed to be the most concise way of saying that I was away to take care of someone else's health needs. I went to Austin to accompany my mother to a series of doctor's appointments. All went well, better than expected, and I'm home again, feeling relieved about that but behind with everything else. Seems to be my permanent state of mind! Meanwhile Etsy is emailing warnings and little lessons about how to get our shops ready for the holiday gift-giving season. Yes, it's true, I did sign up for those emails. I have only myself to blame.

I'm trying not to panic!


The picture above features a good idea for a placemat that took way too long to make, in my opinion. That is, too long for an item to sell for approximately five dollars.  It's cute with all the little different patterned squares that pop out from the neutral "background" and I have to admit I would love to make more. It's a bad photo and looks much better in person! The pieced pattern is the same pattern idea I used in my never-ending baby quilt project. I'm thinking someone else out there could do a better job.

Because I have so much fabric, I have the urge to sew some things. Gift items for my shop? Yeah, that makes sense. However, in the past I have not had huge success selling hand-sewn items and it is difficult to charge enough to cover my time. Maybe it's just me but sewing takes forever! The measuring, the cutting, the pinning, sewing, clip corners......and on and on. Not to mention the do-overs! I've tried and rejected the idea of making placemats before so I really have to question my sanity for trying them again. It is just so tempting because the hand-printed fabrics from India in my shop are so perfect for tabletop items such as table cloths, runners, napkins, and placemats.


And then, I had this reversible placemat idea.


The construction of this one is a little different and I do like the way it came out. It is basically four layers of quilting weight cotton fabric so there is table protection without the puffiness of batting. It is the perfect weight! I added the side borders to the center piece on both front and back of the placemat, sewing the seams onto a plain cotton "foundation fabric". This is the string quilting method I talked about a few weeks ago. Then I put the front and back together, right sides together, and sewed all the way around leaving a gap for turning. You know the drill: cut corners, turn right side out and then sew all the way around again, closing the gap. Sorry I forgot to take pictures and have decided not to do it again! It's not hard but it took too much time for a shop item. What could I charge for one placemat? Five to seven dollars? Ten at the most? Of course I'd sell them as a set of four. Not sure anyone would spend $40 for four placemats. The going rate seems to be about $20 - $35. 

This is why I like to sell fabric by the yard and save my sewing time for my own gift making!

But I will probably keep trying....


Wednesday, August 21, 2013

String Quilted Placemat Tutorial

Years ago, when I first opened my etsy shop, I tried several ways to make a placemat. I wanted the placemat to be very flat and thin, made up of only one or two layers of fabric. I don't really care for quilted placemats because of the batting, although I like the look of pieced placemat. The batting offers more protection but I don't like the puffiness. I never came up with a solution I liked very much or that I thought was special enough to sell in my shop or give as a gift. It never occurred to me that I could make a pieced placemat that wasn't quilted. Hey, I'm relatively new to this sewing thing!

And so, just the other morning, I was browsing through one of my favorite sewing-idea books, Alabama Studio Style by Natalie Chanin. The book has all sorts of amazing tutorials on ways to embellish fabric items. Most are quite elaborate and are geared towards clothing but they can be adapted to home fashion items also. I was drawn to a more simple technique called "string quilting"where one sews strips of fabric directly on to a foundation fabric. The tutorial was for a string quilted throw pillow but I saw immediate possibilities for that simple, flat placemat I had been searching for!


Here you see my first almost-final effort, looking a little wonky and hiding behind a plate. I wasn't really planning to sew that day but was so anxious to see how this string quilting thing would work. I do need to refine my product! Therefore, this is more of a "come along with me on the process" tutorial.


My first though was: how do I make four fat quarters into four placemats? The fat quarter being approximately 18" x 22" is much larger than the average placemat, which I consider to be around 12" x 17". To start with, I simply took the 18" measurement down to 14" and then cut each 22" width into 8 even 2.75" strips. I just pieced all those strips together without a foundation just to see what size it would be. This is much easier for me than doing the math! I used a 3/8" seam because that's the width of the foot on the sewing machine. Once again, the easiest way! This turned out well because 2 seams per piece adds up to .75", so the visible strips are a nice even 2" wide. 


I was not super impressed with my first arrangement so I turned one side around for a more symmetrical look. This would mean that I would be better off keeping one wide strip for the center. So, decide which fat quarter will be the center and cut the width into 4 even strips 5.5". But there is another problem. All the sides are going to be turned under and folded to the back to hide the raw edges and create a binding. So, those two end strips are not going to be the even 2" anymore. That might be OK with you or you might want to figure something else out. 


I decided to come up with a less even arrangement. I also decided to simplify the color scheme. The math started to get more complicated, which did not make me happy, because I was trying very hard to keep this as a four-fat-quarter project. Sadly, I was not successful with that goal and am still trying to figure it out! In the meantime....

The following calculation will give you a placemat that is approximately 17" wide. I would cut the 18" measurement on the fat quarter (18" x 22") down to 16" rather than 14"(as I did). You will see why when I get going on the "how to" part of this post.

Fabric A (red) = four 5.5" strips (1/4 of 22" width)
Fabric A (again) = eight 2.75" strips (1/8 of 22" width)
Fabric B (green) = sixteen 2" strips (this is more than a fat quarter width, so you'll need a 1/2 yard)
Fabric C (white) = eight 2" strips 

Of course, you can use whatever combination of fabrics you like. A combination of solids and prints would be especially nice. I also sell single fat quarters that you could buy and mix with whatever else you have in your supply basket!


This is why we have to do all the math ahead of time! You need to cut your foundation fabric to the size you want your placemat to be. I like to cut a template so I don't have to measure the same square over and over. Then I just trace around the edges and cut. Select a fabric that will look good on the back of your placemat. If it's nice enough, you could also call it a reversible placemat! I recommend a sturdy and thick fabric like canvas. Or, you could layer two fabrics together to achieve the sturdiness and thickness. I am using my favorite hemp/linen canvas that is a really nice neutral color. Hemp has great absorbency and even some anti-bacterial properties, so it's perfect for a placemat. 


If you have enough fabric to be fussy, it's nice to consider the print placement within each stripe. This is an easy technique I learned way back when. Just cut a strip of paper the width of the fabric you need to cut, find the center of the paper strip and mark it. Then, line that mark up with the motif you would like in the center of your stripe. Mark your fabric at the two ends of your paper strip and cut. 


Also, being hand-printed fabric, ripping the fabric down the grain may not work as it can be slightly off. Better to line up the motifs with your ruler and trim.


Find the center on both the decorative and foundation fabric. Place your decorative fabric in the center with an even amount (hopefully 2") extending over the top and bottom edge of the foundation. Secure with maybe two pins somewhere in the middle.


Then, right sides together, line the edges of Fabric B strip with Fabric A. If your fabric is directional like mine is, be sure the motifs are going in the same direction. Pin those edges securely. 


Sew those two seams. Just line the fabric edge up with the outside edge of the presser foot which will give you a 3/8" seam. Since you can't see any other marked guides with the foundation fabric in the way, this is the easiest thing to do. I have that little piece of white tape marking a 1/8" seam which I could add a 1/4" mark to, but the outside of the presser foot is still easier to see. And I'm lazy.


You will want to press the two seams we just made before adding the next strip from Fabric C. Line it up with the Fabric B strips (which you can't see because they are the same size of Fabric C strips on top) just as we did in the previous step. Sew those two seams just as before. Iron seams open and flat. Add next strip, etc. etc., until you reach the end.


Once the top is done, you can turn it over and see the beautiful and tidy stitches on the back! Lovely! Now you will want to trim the border so it's even. I ended up having to trim mine down to only one inch which then resulted in a half-inch binding. I had cut my strips to a 14" length and this is why I  now recommend the 16" length. I think it's best to have a  2" border so that when you fold it over it will be a one inch border. 


First, turn under...


....and then fold that in half. Bring that folded edge back up over the foundation fabric and pin.


When you get to the corner, you will want to just pinch it in ever-so-slightly so that the raw edges won't stick out once it's folded over. I hope you can see what I'm doing there.....it's sort of like gift wrapping. It's probably the hardest part of the whole project (besides the math!)


Pin that down so it doesn't get away!


Carefully sew 1/8" from the inside folded edge of your decorative border, from one end to the other (not all the way around). This is where I use my white tape marker.


Your stitched corners should look like this. 


And like this on top. 


Here is a photo of the whole border from the back. Looks pretty nice. But it would look nicer if it were wider and that would also be easier to work with! Next time!

As a reward for reading through that whole tutorial, I will give you a special code to receive 40% off your total order of anything in my shop

GO2YARDWORK

Enter the code at check-out.
This is only good through August 31, 2013. 
Happy Sewing!