

Here are my new stencils. I have decided to sell them as a pack of 4 rather than individually. Of course, these will all be stacked up neatly and sealed in a bag. All four stencils work together and they also all work, together or individually, with most of my clear decor stamps. One of the reasons I started this blog was so that I would have a place to put the instructions! Too elaborate to fit on the packaging! And don't we learn almost everything on the internet these days?
So, let's get right to it by starting, once again, with a "charm square" or a 5.5" to 6" square of fabric.

Here is my hand-cut charm square. That is why it is a bit wonky, I cut it myself. Tried to make it look like a professionally manufactured one, but as you can see the top edge is crooked. Oh well, it won't matter! I have folded my little square in half both ways to mark the center.

And this is why I marked the center. So that I can just plop the stencil down with the center motif lining up with the center of my fabric square. Here I am also experimenting with this new gripper mat I purchased recently. The mat is gently holding both the fabric and the stencil in place. No taping! Amazing!

I have poured out a small pool of one of my favorite colors of fabric paint onto a semi-transparant sheet of plastic that I purchased somewhere. Have no idea where or why I bought this. It is sort of like a plastic placemat. I suppose I thought it would be good for something and here it is! I like to use a foam roller from the hardware store for stenciling but you could use a stencil brush or sponge-on-a-stick (which I will show you very soon). Roll your roller in the paint so it is somewhat evenly distributed.

Then, you guessed it, you roll your paint over your stencil. This is where my new no-slip mat is coming in very handy. The stencil is staying right where it should be. Of course, you don't need to have the mat for stenciling success, you can use tape or just hold it all still with your other hand.

And here we go! Bravo!

Once you have finished with your first paint color, go directly to the sink and wash-up. My plastic placemat is working very well here! You need to have some sort of flat surface under the stencil so that it won't get damaged. A clean cutting board or some such thing will do. You will need to use a drop of dish soap to get the paint out of your fancy sponge roller.

You can just place the wet stencil on a towel where it will basically air-dry. If you need the same stencil immediately, fold the towel over the top and gently blot dry. Handle the stencils with care and they will last a very long time.

You could choose to use one of the other stencils to add more color and design to your square, but I am going directly to my stamp collection. The stamps I am using for this project come from my "Wire Flowers" stamp set. Wishing my grip sheet had grid markings, I had to move over to my cutting board. It is possible to simply "eyeball" where the stamp should go, centering it in between four of the stenciled motifs, but for increased accuracy, I have lined fabric and stamp up with the grid lines on the board.

Then we load the stamp with fabric paint. For this, my favorite tool is my previously mentioned sponge-on-a-stick. Otherwise known as a stenciling sponge. You want to pounce your sponge in the paint and then on a clean area of your paint holder (in this case a repurposed tuna can) so that there are no heavy globs of paint. Then, pounce very lightly on the stamp, being careful to get the paint only on the raised areas of the stamp. Eventually the paint will get all around the middle and sides of the stamp, no matter how hard you try. Then you line up your stamp and gently press, just as we did before in this tutorial.

I wanted my finished square to look like it was cut from printed yardage, so I had to go off the sides to print the repeating motif. I recommend adding paint only to the part of the stamp that will appear on the fabric. Trying hard to limit the mess.
So, there you have step #2. You can also see why my cutting board is so stained! Wipe up the mess as quickly as you can!

Step #3, add another motif in another color! This time it is very easy to line the small stamp up with the other motifs. Add paint, press stamp, repeat.

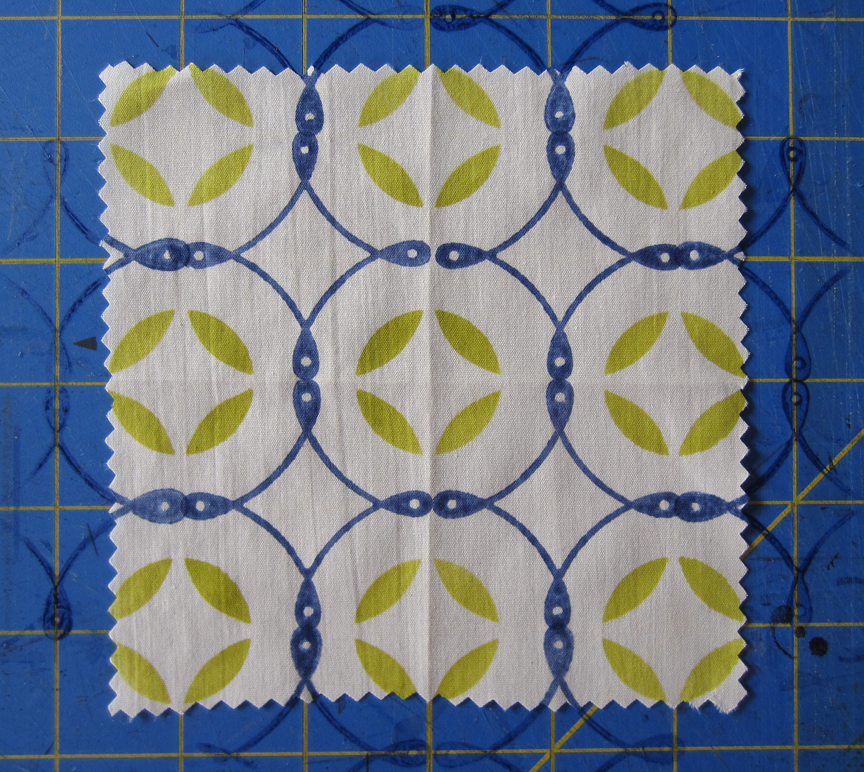
A very happy, colorful, hand-stenciled and stamped charm square! And this is just one out of endless possibilities! I will have the stencils in my shop very soon. Just need to post one more tutorial where we will learn how to repeat the design over and over again, across yards and yards of fabric!
These stencils look great. I love your stamps and can see loads of potential designs. Thanks also for your great tutorials. They are what actually convinced me that I had to have your stamps! Lou
ReplyDeleteStencils! How exciting! You keep coming up with such great ideas - stencils would be perfect for printing large pieces of fabric.
ReplyDeleteThanks! It is my pleasure. More tutorials coming right up!
ReplyDelete